I'm sure that there will be questions, but I only ask that you post the questions here rather than email so that everyone can benefit from the answer and I don't have to repeat myself.
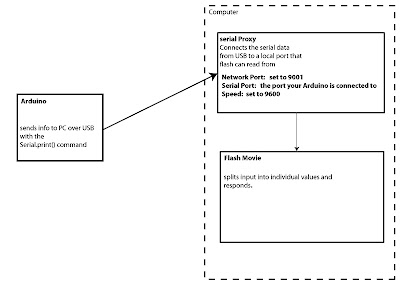
Here's the overall setup of how it works:
 -The code in Arduino sends the data over USB by using the Serial.print() command
-The Serial Proxy Program receives the data from the USB port and connects it to an internal port that flash can read.
-The information is then unpackaged and applied in Flash.
Step 1- download the files HERE
Important Notes on the Arduino Code:
-baudRate that it is communicating at: In our case 9600
-the order that you are collecting the button info in
The Serial Proxy must be running BEFORE the flash file
Network Port: 9001
Serial Port: Find out from Arduino on mac it will be the usbserial-XXX one
Speed: 9600
Input all these settings BEFORE you hit Start
if it works it will say:
Listening on port 9001…
opened com port usbserial-XXXXX
Flash example 1
This example is a basic test, once splitting the incoming values into our Array called input. we can then apply it.
such that
input[0] = button1value
input[1] = button2value
input[2] = button3value
input[3] = button4value
the if statements are constantly updating so when it receives a buttons value as 1 it moves the movieclip to pixel 350 and when it receives 0 it moves it to pixel 36.
the way you can do that is by giving each movieclip an instance name:
I called them button_1,button_2,button_3,button_4
and the syntax to move them in x is button_1._x = ?
the value is the pixel value on the screen.
Flash example 2.
This example expands the complexity slightly to use the buttons as a trigger. The way it does that is by storing the previous value so we can have an animation play only on the time when it switches, Otherwise it would keep starting the animation an not let it finish.
This same example could really easily be changed to play audio or load another movieClip. You would just change the code after the If Statements.
No comments:
Post a Comment